

This is a little enhancement to the earlier blog post and challenge from #10weeksofcloudops initiated by Piyush Sachdeva
itmynet.com/how-to-create-a-static-website-..
In this part, let us see how we can use GitHub actions to deploy our website to Azure.
Assuming that you have seen the earlier post and created a site and created a CDN profile, we will do the configuration needed for the GitHub actions workflow.
Collecting Azure Information.
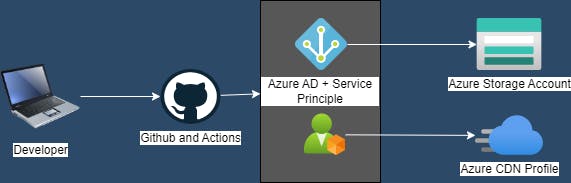
Create a service principal (sp) account on Azure - This account will have the necessary permissions to access and modify storage accounts and CDN profiles and will be used on GitHub Actions.
Assigning the roles for the newly created spn. (Storage Account access & CDN)
Creating secrets on GitHub Actions.
Creating workflow YAML file and testing.
1. Collecting Azure Information
Let's identify some basic information about our Azure environment, these will be used in our workflow and creating repository secrets. Have this ready.
a. Tenant ID
b. Subscription ID
c. Resource Group Name, where our resources are placed
d. Storage Account Name
e. CDN Name (run az cdn profile list)
f. CDN Profile Name
g. Storage Account Connection String
2. Create a service principal (sp) account on Azure
To connect to Azure and do the required activities, we are going to create a service principal with the necessary permissions. Custom role-based access control needs P1 or P2 licenses which we do not have. Hence, we are going to create and assign contributor permissions on the storage account and CDN.
In these steps, get the below information
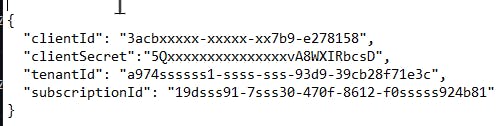
a. Application secret (client secret)
b. Application ID (client ID)
Goto Azure Active Directory -> App registrations -> Select New Registration
Give the application a name and click 'register'

Select the newly created app and go to certificates & secrets -> New client secret

Now, have the new client secret 'Value' which is displayed, saved in a safe location and do not expose it to anyone
- Select Overview on the left side and copy the Application (client) ID and save it as well
3. Assigning the roles for the newly created sp
Now that we have created the service principal, lets assign the contributor role for storage account (to deploy the website + add the public IP exclusion dynamically) and CDN (to purge the cache)
Select the storage account -> Access Control (IAM) -> Role assignments tab and Add role assignment
Search and select storage account contributor and in the Members tab select the service principle you created then review and assign.

Follow the same procedure for CDN. Go to Azure CDN -> Select the endpoint -> Access Control (IAM) and assign the service principle 'CDN endpoint contributor' role.
Now that we have needed and configuration and information collected, let us proceed to github and start the workflow preparation
4. Creating secrets on GitHub Actions.
GitHub uses YAML for its workflow and since we are passing in some information as arguments, we will create secrets to store the collected information.
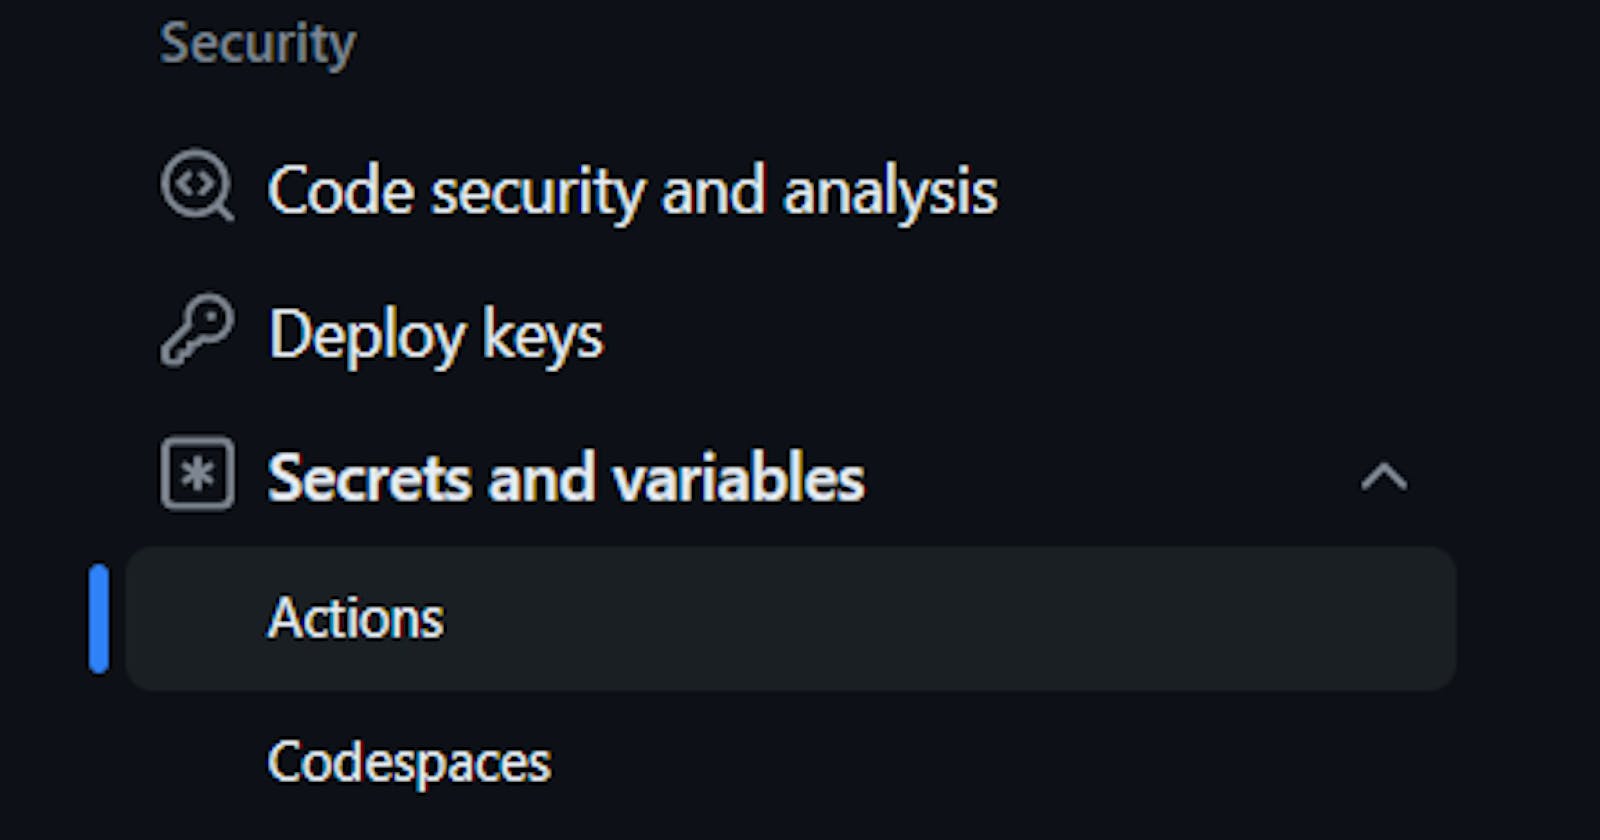
- Go to your repository and select Settings
Under Security select Actions -> New repository secret and create the below secrets.
| Name | Secret Value |
| AZURE_CDN_NAME | Name of your CDN endpoint |
| AZURE_CDN_PROFILENAME | Name of your CDN Profile |
| AZURE_CDN_RESOURCEGROUP | Resource Group name in which you have your CDN |
| AZURE_CREDENTIALS | Refer Image below. |
| AZURE_STORAGE_CONNECTIONSTRING | Go to your storage account -> Access Keys and copy the connection string |
5. Creating workflow YAML file and testing.
In your root repository, create a directory named .github and create another directory named workflows inside it.
My directory structure looks like this below.
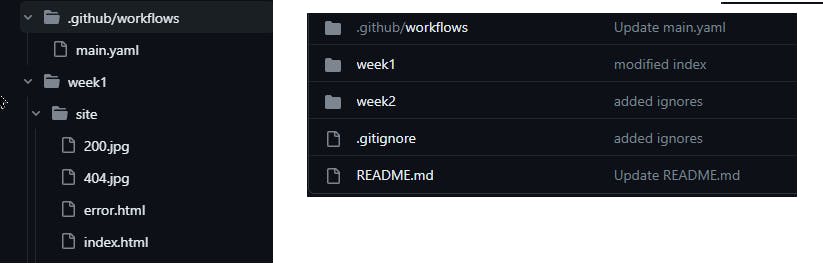
- Inside the workflows directory create a file named main.yaml and write the code.
name: azure-static-website
run-name: Build
on:
  push:
    branches:
      - main
    paths: #optional, this runs only when the contents of site folder changes
      - 'week1/site/**'
jobs:
  push-site-toazure:
    runs-on: ubuntu-latest #this is the runner name (the vm that runs the workflow)
    steps:
      - name: Check out repository code
        uses: actions/checkout@v2

      - name: Azure Login
        uses: azure/login@v1
        with:
          creds: '${{ secrets.AZURE_CREDENTIALS_13MAY}}' #The secret we created for you it might be just AZURE_CREDENTIALS and not 13MAY

      - name: Add the IP address to azure storage exclusion #Here, i am getting the IP address of the runner and adding it to the exclusion on storage firewall
        run: |
          ip_address=$(curl https://api.ipify.org -s)
          echo The IP address of the runner is $ip_address
          az storage account network-rule add --account-name 10wcosa --ip-address $ip_address
          sleep 200
      # The sleep 200 waits for 200 seconds before proceeding to run the below step

      - name: Deploy to Azure Static Website #In the below, $web is the container where we are uploading our files to.
        run: |
          az storage blob upload-batch --overwrite --account-name 10wcosa --connection-string '${{ secrets.AZURE_STORAGE_CONNECTIONSTRING}}' --destination '$web' --source ./week1/site/ --pattern "*.html"
      - name: Purge CDN to clear all the cache # Since we are using CDN, we will be puring the CDN to clear all the caches of our website
        run: |
          az cdn endpoint purge --resource-group '${{ secrets.AZURE_CDN_RESOURCEGROUP}}' --name '${{secrets.AZURE_CDN_NAME}}' --profile-name '${{ secrets.AZURE_CDN_PROFILENAME}}' --content-paths '/*'
          sleep 60
      - name: Remove excluded IP from storage #This removes the IP exclusion added to the storage firewall, since we dont need it now.
        run: |
          ip_address=$(curl https://api.ipify.org -s)
          az storage account network-rule remove --account-name 10wcosa --ip-address $ip_address
Commit the changes and do a pull request from your laptop if you have edited this directly from github.
Now edit the index.html or any files inside the site folder and assuming you have already have git on your system do the push to github.
git add .git commit -m "any message"git pushNow you should see the workflow running and deploying your website

Thats about it and if you have any issues or suggestions, please feel free to drop me a comment on my linkedin post or here.